Tampilkan postingan dengan label Article. Tampilkan semua postingan

Program Delphi " Entry Data Pelanggan "

Jumat, Maret 29, 2013

Assalammu'alaikum....Pada artikel ini saya akan memberikan tutorial membuat program entry data pelanggan memakai bahasa pemogramman delphi. Oleh karena itu, bagi pembaca dimohon untuk mempelajari bahasa pemogramman Delphi terlebih dahulu agar dapat mudah memahami.

Oh...iya sedikit saran agar cepat bisa dan cepat memahami alur program, sintaks program jangan di Copy Paste melainkan ketik ulang. Bukannya melarang,  Copas diperbolehkan...toh ini cuma saran :)

Baiklah, mari mulai membuat programnya :

  • Bukalah Aplikasi Xampp terlebih dahulu dan jalankan Apache serta MySQL servernya....
  • Buat project baru, pilih File ---> New ---> VLC Form Application atau langsung klik New Project pada tampilan awal Delphi.


  • Design Form seperti pada gambar dibawah


No Komponen Properties Value
1 Label1 Caption Kode Pelanggan
2 Label2 Caption Nama Pelanggan
3 Label3 Caption Alamat
4 Label4 Caption No Telp/Hp
5 Label5 Caption Entry Data Pelanggan
6 Edit1 -- --
7 Edit2 -- --
8 Edit3 -- --
9 Edit4 -- --
10 Button1 Caption Save
11 Button2 Caption Edit
12 Button3 Caption Delete
13 Button4 Caption Exit
14 DBGrid Data Source DM.DS
  • Menambahkan modul, Klik kanan pada Project1.exe pilih Add New – other – Delphi files – data module

  • Tambahkan pada modul TADOConnection, TADOQuery, dan TDataSource, dan lakukan perubahan properties :
No Komponen Properties Value
1 Data Module Name DM
2 ADOConnection1 Name Koneksi
Login Prompt False
3 ADOQuery1 Name Query1
Connection Koneksi
Active False
4 ADOQuery2 Name Query2
Connection Koneksi
Active False
5 Data Source Name DS
Data Set Query1

  • Select pada Koneksi (TADOConnection) dipropertisnya bagian “connection string”


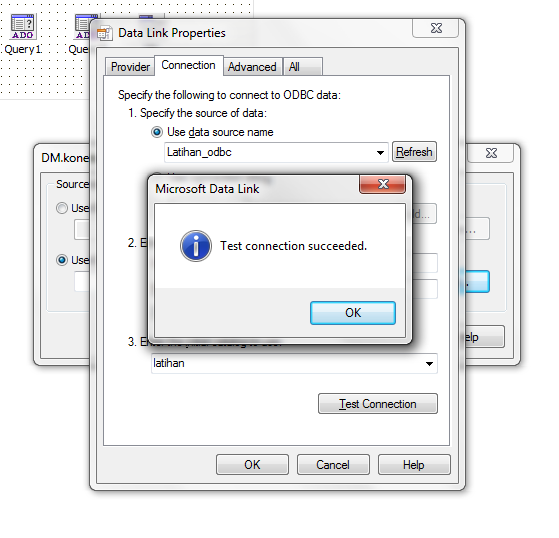
Pada gambar diatas untuk Use Data Source Name pilihlah data source yang telah dibuat pada artikel kemarin, lihat disini Membuat Data Source ODBC.

Untuk no 2 dikosongkan saja dan untuk no 3 pilih database yang juga telah dibuat pada artikel sebelumnya, lihat disini Membuat Database serta tabel menggunakan XAMPP.

Langkah selanjutnya Test Connection, jika tampilan seperti gambar dibawah in maka koneksi berhasil…
  • Select pada Query1 (TADOQuery1), pada properties dibagian connection…
           Begitu juga untuk Query2 (TADOQuery2)
  • Dan untuk DS (TDataSource), pada propertiesnya atur seperti pada gambar…

  • Pindah ke Unit1 (Form1) select pada TDBGrid1, pada propertiesnya bagian DataSource
  • Selanjut pindah ke bagian Code, ketik Uses Unit2; dibawah Implementation.
  • Dibagian Code, dibawah Private ketikan code berikut :

  • private
        { Private declarations }
        procedure bersihdata;
        procedure tombolmati;
        procedure tombolhidup;
        procedure tampil;
    
    
  • Ketik sintak procedure berikut dibawah Uses Unit2;

  • private
        procedure tform1.tampil;
    begin
      with DM.query1 do
      begin
        sql.clear;
        sql.add('select * from Pelanggan');
        Active := false;
        Active := true;
      end;
    end;
    
    procedure tform1.bersihdata;
    begin
      Edit1.clear;
      Edit2.clear;
      Edit3.clear;
      Edit4.clear;
    end;
    
    procedure tform1.tombolmati;
    begin
      Button1.Enabled := true;
      Button2.Enabled := false;
      Button3.Enabled := false;
    end;
    
    procedure tform1.tombolhidup;
    begin
      Button1.Enabled := false;
      Button2.Enabled := true;
      Button3.Enabled := true;
    end;
    
  • Select pada form, pilih event On Show dan ketik sintaks berikut

  • procedure TForm1.FormShow(Sender: TObject);
    begin
       bersihdata;
       tampil;
       tombolmati;
    end; 
    
  • Untuk Button Save (Button1) ketik Syntax dibawah ini…

  • procedure TForm1.Button1Click(Sender: Tobject);
    begin
    if length(Edit1.Text) > 5 then
      begin
        messagedlg(‘Maaf, kode pelanggan harus 5 karakter’,mtWarning,mbOKCancel,0);
        Edit1.setfocus;
        exit
      end;
    if messagedlg(‘Apakah anda yakin akan menyimpan data ini?’, mtConfirmation,[mbYes,mbNo],0) = mryes then
      begin
        with dm.query2 do
          begin
            sql.clear;
            sql.add(‘insert into pelanggan (kd_pelanggan,nm_pelanggan,alamat,no_hp)’);
            sql.add(‘values (“’+ Edit1.text +’”,”’+ Edit2.text +’”, “’+ Edit3.text +’”,”’+ Edit4.text +’”)’);
            ExecSQL;
          end;
          tampil;
          bersihdata;
          tombolmati;
          ShowMessage(‘Data berhasil disimpan…’);
          Edit1.setfocus;
      end;
    end; 
    
  • Sebelum melakukan pengeditan data harus ditampilkan terlebih dahulu melalui metode pencarian yang dilakukan berdasarkan kode pelanggan dan sintaks di ketikan pada event TextChanged yaitu pada komponen Edit1, ketikkan...

  • procedure TForm1.Edit1Change(Sender: TObject);
    begin
    if Edit1.Text <> '' then
      begin
        with dm.query2 do
        begin
          sql.clear;
          sql.add('select * from pelanggan where kd_pelanggan="'+ Edit1.text +'"');
          open;
          if not eof then
            begin
              Edit2.Text := FieldValues['nm_pelanggan'];
              Edit3.Text := FieldValues['alamat'];
              Edit4.Text := FieldValues['no_hp'];
              tombolhidup;
            end
          else
            begin
              Edit2.clear;
              Edit3.clear;
              Edit4.clear;
              tombolmati;
            end;
        end;
      end;
    end;
    
  • Untuk Button Edit (Button2), ketikan...

  • procedure Tform1.Button2Click(Sender: Tobject);
    begin
     if messagedlg(‘Apakah anda yakin akan mengubah data ini?’, mtConfirmation,[mbYes,mbNo],0) = mryes then
      begin
        with dm.query2 do
          begin
            sql.clear;
            sql.add(‘update pelanggan set nm_pelanggan=”’+ Edit2.text +’”,alamat=”'+ Edit3.text +'",no_hp="'+ Edit4.text +'"');
            sql.add('where kd_pelanggan="'+ Edit1.text +'"');
            ExecSQL;
          end;
          tampil;
          bersihdata;
          tombolmati;
          ShowMessage('Data berhasil diubah...');
          Edit1.setfocus;
      end;
    end;
    
  • Untuk Button Delete (Button3), ketikkan...

  • procedure TForm1.Button3Click(Sender: TObject);
    begin
    if messagedlg('Apakah anda yakin akan menghapus data ini?', mtConfirmation,[mbYes,mbNo],0) = mryes then
      begin
        with dm.query2 do
          begin
            sql.clear;
            sql.add('delete from pelanggan where kd_pelanggan="'+ edit1.text +'"');
            ExecSQL;
          end;
          tampil;
          bersihdata;
          tombolmati;
          ShowMessage('Data berhasil dihapus...');
          Edit1.setfocus;
      end;
    end;
    
  • Untuk Button Exit, ketikkan ...

  • procedure TForm1.Button4Click(Sender: TObject);
    begin
    close;
    end;
    
Untuk Source Program dapa anda download : Program Entry Data Pelanggan

Membuat Data Source ODBC di Windows 7


ODBC singkatan dari Open Database Connectivity yang merupakan standar yang membantu dalam konektivitas antara sebuah aplikasi dengan subauh Sytem Manajemen Basis Data (SMBD), ODBC ini agar dapat digunakan untuk mengkoneksikan ke Database yang harus dilakukan adalah menginstall driver ODBC yang berhubungan dengan Database yang bersangkutan, contoh dalam artikel ini saya menggunakan MySQl - Database dan untuk link download Driver ODBC untuk MySQl silihakan klik disini Connector ODBC


Nah, sedikit pengetahuan mengenai ODBC

Sekarang....ayo mulai bagaimana cara membuat Data Source ODBC yang dihubungankan MySQL :

  • Buka aplikasi Xampp dan aktifkan Apache dan MySQL servernya
  • Start ---> Control Panel ---> Administrative Tools
  • Pilih Data Source ODBC
  • Pilih Add...
  •  Pilih MySQL ODBC 5.1 Driver, jika tidak silahkan install dulu MySQL ODBCnya dan link download telah disediakan diawal...
  •  Mengkonfigurasi Data Source ODBC, dengan konfigurasi sebagai berikut :
          - Data Source Name            : latihan_odbc
          - Server                               : localhost
          - User                                  : root
          - Database                           : Latihan

          Dari konfigurasi diatas untuk Data Source Name dapat diganti sesuai keinginan dan Server serta User merupakan default dari Xampp atau default dari Web Servernya , tetapi jika ingin menggantinya langsung dari Xamppnya kemudian terakhir untuk Database saya mengambil dari database yang telah saya buat pada postingan Membuat Database serta tabel menggunakan XAMPP.


          Jika semuanya telah disi, cobalah untuk untuk test connection, pilih test..


          Kalau sudah Connection Succesful, untuk penyelesaian pilih OK disetiap langkah.

Note : Artikel ini masih ada hubungannya pada artikel selanjutnya. Jadi, untuk awal ikuti saja apa yang ada pada artikel ini.

Semoga Artikel ini Bermanfaat...
Untuk Versi File nya dapat anda download : Membuat Data Source ODBC

Share File Memakai Media Bluetooth

Selasa, Januari 08, 2013
Mengirim file atau sharing suatu file memakai media Bluetooth lebih sering kita lihat yaitu dari suatu handphone ke handphone lainya dan pastinya handphone tersebut memiliki feature Bluetooth agar saling terhubung.

Tapi bagaimana dengan media computer/laptop?

Jawaban dari pertanyaan diatas sangat mudah yaitu “tentu bisa” untuk computer atau laptop jaman sekarang sudah memiliki feature blueatoot, dan bagainmana jika tidak ada Bluetooth? Hmm…teknologi sekarang sudah berkembang dan maju tentu saja untuk computer atau laptop yang tidak memiliki fasilitas Bluetooth dapat memakai Bluetooth device eksternal yang bentuknya sama persisi denga flashdisk tapi Bluetooth ini bukan untuk media penyimpanan seperti flashdisik walaupun dan hal rupa sama. 

Pengenalan Komputer

Senin, Juli 23, 2012
Salam semua....
Pada postingan kali ini saya membahas atau mengulang sedikit pengetahuan tentang komputer, sebenarnya untuk pengetahuan komputer itu sendiri tidak perlu saya tulis dikarenakan sudah banyak website atau blog yang membahas tentang komputer dan disini saya berikan link wikipedia yang didalamnya lengkap tentang komputer dan anda juga dapat membacanya. Berikut link wikipedia :


hmm...sebenarnya postingan saya kali, saya lebih ingin membahas tentang pengenalan isi dari komputer seperti komponen yang ada pada komputer contoh Motherboard, Memory, Harddisk, dll. Nah, itu dapat anda baca dengan mendownload pada link dibawah ini karena saya membuatnya di dalam MS.WORD dan isinya lumaya panjang, jadi saya hanya menyediakan link downloadnya saja.

Memulai Membuat Program Sederhana dalam VB.NET

Kamis, Juli 19, 2012
Hmm…saya telah menanamkan niat untuk selalu aktif dalam ngeblog, maka dari itu saya akan berusaha untuk selalu memberikan artikel – artikel yang bermanfaat kepada para pembaca dan sahabat blogger saya didunia. 

Seperti halnya pada judul sekarang kita akan memulai untuk permulaan yaitu membuat sebuah program sederhana dalam VB.NET dan program ini saya beri nama Program Menampilkan Pesan dari Textbox, hihihi….nama program yang panjang . Untuk itu pastikan para pembaca dan sahabat blogger membaca artikel saya yang sebelumnya dikarenakan sangat berhubungan dengan artikel saya saat ini.

Memulai Membuat Program Sederhana dalam VB.NET

Hmm…saya telah menanamkan niat untuk selalu aktif dalam ngeblog, maka dari itu saya akan berusaha untuk selalu memberikan artikel – artikel yang bermanfaat kepada para pembaca dan sahabat blogger saya didunia. 

Seperti halnya pada judul sekarang kita akan memulai untuk permulaan yaitu membuat sebuah program sederhana dalam VB.NET dan program ini saya beri nama Program Menampilkan Pesan dari Textbox, hihihi….nama program yang panjang . Untuk itu pastikan para pembaca dan sahabat blogger membaca artikel saya yang sebelumnya dikarenakan sangat berhubungan dengan artikel saya saat ini.

Pengenal Visual Studio (VB.NET) - Part II

Kamis, Juli 12, 2012

Hihihi...saya lanjutkan postingan kemarin...

Dapat anda lihat dari gambar diatas merupakan tampilan dari dimana kita akan memulai untuk membuat sebuah program dan tampilan tersebut dinamakan Integrated Development Environment disingkat dengan IDE atau sebagai Integrated Design/Debugging Environment yang maksudnya inilah perangkat atau inilah tampilan sebuah perangkat yang akan kita gunakan untuk membuat sebuah program.

Jadi, untuk para pembaca serta sahabat blogger yang ingin mempelajari VB.NET ini terlebih dahulu pahami setiap bagian pada VB.NET tesebut, seperti halnya yang terlihat pada gambar diatas ada beberapa bagian penting yang saya beri tanda, berikut nama bagaian tersebut :

Pengenalan Visual Studio 2008 ( VB.NET) - Part I

Selasa, Juli 10, 2012
Visual Studio 2008 atau yang lebih dikenal dengan VB.NET Merupakan bahasa pemogroman yang dimana natinya didalamnya dapa membuat berbagai aplikasi - aplikasi untu windows serta web dibanding dengan VB.NET sebelumnya yaitu bersi 6 didalamny hanya diperuntukkan untuk aplikasi - aplikasi desktop.

  • Memulai Lembar kerja ( Membuat New Project) di VB.NET

Postingan saya sebelumnya membahas bagaimna cara menginstall Visual Studio 2008 ini setelah Visual Studio 2008 ini atau VB.NET ini terinstall didalam system operasi anda selanjut adalah menjalankanya dimana akan dimulai dengan membuat New Project.

berikut langkah - Langkahnya :

Menginstall VB.NET 2008

Sabtu, Juli 07, 2012
Hmm....akhirnya sudah lama vakum di dunia blog niat untuk ngblog timbul kembali dengan bergantinya tampilan dari MandaiPC ini semoga tutorial-tutorial yang bermanafaat akan selalu hadir di blog ini. MandaiPC hadir dengan tampilan yang simple jadi semoga para pembaca dan sahabat blogger yang berkunjung betah untuk selalu berda di dalam blog ini dan dimohon juga kritik dan saran untuk kemajuan blog ini.

Dengan pengenalan yang saya rasa cukup, dan sekarang masuk dengan pembahasan yaitu menurut judul "Menginstall VB.NET 2008". VB.NET merupakan aplikasi pemograman dimana kita diberi keluasan untuk membuat sebuah program dengan bahasa yang compatible dengan aplikasi VB.NET itu sendiri.

Nah, jika para pembaca dan juga para sahabat blogger ingin mempelajarinya silahkan download dibawah ini karena jika saya tulis diblog ini penginstallannya cukup panjang jadi saya mengubahnya ke PDF yang nantinya para pembaca dan juga sahabat blogger dapat mendownloadnya terus mempelajarinya.
Berikut Link Download :

Command on The MYSQL by Sebastian Mandai

Jumat, April 22, 2011
What is MySQL?
MySQL is one type of database server that is very famous for its popularity due to MySQL using SQL as the language basis to access the database. In addition, it is Open Source (you do not have to pay to access them) on various platforms (except for type enteprize, which is commercial).MySQL including the type of RDBMS (Relational Database Management System), which is why the term table, columns, and rows are used in MySQL. In MySQL, a database containing one or more columns and rows contain multiple columns, the term table, rows, and columns can be seen from the practice later ... ..!!!.

Preparation:- The first computer already exists mysql- Be careful.

1. Set the root password
The command to give the password is:
Mysqladmin-uroot password [name of the password]
Example:
Mysqladmin-password uroot mandai

2. Opening MySQL from dosOpen up the dos and typing this command:
Mysql-u root-p
And as it appears
Enter password:
Enter your password you provided.
3. Creating a database
how to create a database by typing the following command:
mysql> create database [database name];
For example:
mysql> create database smk_labor;

4. Enabling a database that was createdEnter this query command:
Mysql> use [database name]
Example:
Mysql> use smk_labor;Database changed
The word changed this database is a message that means that you have enabled database that you created.

5. How to view a list of tables
Typing the command beriku:
Mysql> show tables from mysql;
So this command will display a list of mysql table

6. How to create table to database
The syntax or command such as:
Mysql> create table [table name] ([Column a] [type] [width],[Column b] [type] [width],... ... ... ... ... .... ... ....,[Column n] [type] [width]);Remember a command that has been completed typed must end with a semicolon [;]Example:
Mysql> create table teacher (nip char (5) not null,name varchar (35) not null,gender enum ('p', 'w')religion varchar (15) not null,);Query ok, o rows affected (0:36 sec)
After that you can still see a series of tables that you can do:By typing the command
Mysql> desc teachers;
Then he will display a table of teachers along with the circuit.

7. Using alter command
Here is perintag ddI alter command used to perform a design change table to table with the new structure.
Type the following command:
Mysql> alter table [table name]Change [data yanga ingiin modified]Query ik, 0 rows affected (0.70 sec)
Example:
Mysql> alter table teacherChange expertise graduates varchar (1 -) not null;Query ik, 0 rows affected (0.70 sec)
So the field name will be changed to graduate skills.
8. Entering data into tablesType the following command:
Mysql> insert into [table name] ([column a, column b, column n]) values ​​([isi_kolom a, isi_kolom b, ... ..., isi_kolom n]);


Example:
Mysql> insert into teacher (nip, name, sex, religion)Values ​​('10023 ',' mind ',' male ',' Islam ');Query ik, 0 rows affected (0.70 sec)
9. Command to see tables
The following table meliha command
Mysql> SELECT * FROM [table name];
Example:
Mysql> select * from teachers
The purpose of this star symbol is a table showing all the contents from nip to graduate.
If you want to show both the name and religion only data type the following command:
Mysql> SELECT [column a, column b] from [table name];
Example:
Mysql> select name, religion from a teacher;


10. Delete the contents table
The following command syntax:
Mysql> delete from [table name] WHERE [column / content you want to delete]
Example:
Mysql> delete from teachers' WHERE field = 'name';Query ik, 0 rows affected (0.70 sec)


Thus the command - the command query that I know ... ..Hopefully you can do it themselves ...

Range of Port Types by Sebastian Mandai

  • Port 80, Web Server This port usually used for web servers, so when users type the IP address or hostname in the web browser then the web browser will see the IP they will be on port 80
  • Port 81, Web Server : Alternative when port 80 blocked the port 81 will be used as an alternative port hosting website 
  •  
    • Port 21, FTP Server When someone is accessing an FTP server, then by default the ftp client will connect through port 21 to ftp server
    • Port 22, SSH Secure Shell This port is used for the SSH port
    • The port 23, Telnet If you are running a telnet server so this port used for connection with telnet client telnet server
    • Port 25, SMTP (Simple Mail Transport Protocol) When someone sends an email to your SMTP server, then the port is in use is port 25
    • Alternate SMTP Server Port 2525 is the port active alternatifi from TZO for menservice email forwarding. This port is not standard ports, but can diguunakan when exposed blocks smtp port.
    • Port 110, POP Server If you run a mail server, users will typically log into the machine via POP3 (Post Office Protocol) or IMAP4 (Internet Message Access Protocol) to receive their email, POP3 is a protocol for accessing mail box
    • Port 119, News (NNTP) Server 
    • Port 3389, Remote Desktop This port is for remote desktop on WinXP
    • Port 389, an LDAP Server LDAP or Lightweight Directory Access Protocol is Becoming popular for Directory access, or Name, Telephone, Address directories. For Example LDAP: / / LDAP.Bigfoot.Com is a LDAP directory server.
    • Port 143, IMAP4 Server IMAP4 or Internet Message Access Protocol is Becoming more popular and is Used to retrieve Internet Mail from a remote server. It is more disk intensive, since all messages are stored on the server, but it allows for easy online, offline and disconnected use.
    • Port 443, Secure Sockets Layer (SSL) Server When you run a secure server, SSL Clients wanting to Secure server connects to your will from the connect on port
    •  Port 443. This port needs to be open to run your own Secure Transaction Server. Port 445, SMB over IP, File Sharing Weaknesses windows which open these ports. This port usually used as a port, including printer sharing file sharing, the port is easily inserted inin viruses or worms and the like
    • Ports 1503 and 1720 Microsoft NetMeeting and VOIP MS NetMeeting and other VOIP allows you to host an Internet call or videoconference with other 16. NetMeeting or VOIP users.
    • Port 5631, PCAnywhere When a PCAnywhere server is set up to receive remote requests, it listens on TCP port 5631. This allow you to run a PCAnywhere host and use the Internet to the connect back and remotely control your PC.
    • Port 5900, Virtual Network Computing (VNC) When you run the VNC server to remotely control your PC, it uses port 5900. VNC is useful if you wish to remotely control your server.
    • Port 111, Portmap  
    • Port 3306, Mysql  
    • Port 981/TCP

    Techniques OCR and OMR by Sebastian Mandai

    Sabtu, April 16, 2011

    Optical Character Recognition abbreviated as OCR, which is where OCR is a technique used to edit the printer file or an image taken through a Scanner. How to edit takes the process and must wear an OCR software that supports engineering, with OCR software that supports the printer file or an image taken through the scanner will be editable.

    The following examples of software that supports OCR techniques:

    Opitcal Mark Recognition or abbreviated as OMR, which is where OMR is a technique for capturing or reading a test sheet which is marked with black like a paper national ujiang characterized using 2B pencil in a way that touches every light black mark that is marked memamkai 2b pencils will be reflected and It will count as a value and if there is no marked just plain light will shine through and not bounce back and was not considered legible.

    sample sheet of the national exams that are marked using a 2b pencil mark where it is an answer that nantinyta will be checked by computer:

    Set a Jump On The Hard Drive by Sebastian Mandai

    A little knowledge is for the beginner in an IT or people who want to learn computers, about how to set a jumper on the disk. Set the jumpers on the hard drive is useful if you have two hard drives in a computer or have an ATA IDE cable in a computer which arranged for the computer to read the hard drive first, because the hard drive is a medium where we keep an Operating System if you have two hard drives and set jumpers on the second hard drive.

    Two hard disk to be configured jumpernya, for the first disk is a disk in which an Operating System is going to be a master and for a second hard drive will be used as Slave.


    See the picture above is a picture Configuration Jumper:

    • Master or Single drive is an option to make the hard drive as master or make the drive to read the first time by computer.
    • Drive is Slave is the option to make the hard drive as Slave, slave intent here as a second choice.
    • Master with non ATA-compatible slave is to make the hard drive as main drive is paired with with non-ATA drive as the slave.
    • Limit Dirve Capacity is Used when no message at start up, "Hard disc drive controller failure", Computers can not detect the new HD installed, or the system no response when installing a new drive

    What's That QR Code (Quick Response Code)

    Jumat, April 15, 2011
    Is there ever heard the term QR Code ...??? probably mostly not been if it had never been here I'll explain what a QR Code. Try you see the picture as well and you definitely think it's just random pictures, not!, It is true that the image seen is nothing but the picture in the QR code can contain a word.

    This picture is familiar to us. But QR Code itself is not new, these innovations invented by Denso-Wave, a Japanese company that was introduced in 1994. QR Code itself is an acronym for "Quick Response Code" in which these codes can be translated quickly using only a brief and camera phones that have been added previously QR code reader application. QR Code has received international standardization and standardization of the Japanese form of ISO/IEC18004 and JIS-X-0510 and has been used extensively via phone in the World. In Indonesia itself was popularized by

    Kompas daily. The benefits of QR Code is that we can directly read the contents contained in the code quickly. QR Code can be used in promotion of a company, save the address of a site / blog, or save paper, save and save the SMS mobile phone number from someone.

    If the QR Code is applied to a website or blog, visitors can immediately see the blog via cell phone or mobile phone. Why This code needs to know?
    QR Code has a high capacity in data coding, which is capable of storing all data types, such as numerical data, alphabetical data, kanji, kana, hiragana, symbols and binary code. Specifically, QR codes can store numeric data types up to 7089 characters, alphanumeric data up to 4296 characters, binary code up to 2844 bytes, and up to 1817 kanji characters. Not only that QR codes are also resistant to damage, because the code is able to correct errors up to 30%. Although most of the QR code symbol dirty or damaged, data can still be stored and read.

    How to Try it?
    If you feel curious about the QR Code, Please download the first QR code reader application of these sites below:


    Well, one of the famous and widely used by users are Kaywa Reader and i-nigma Reader.
    If you are using KAYWA Reader, HP's version which has been supported is as follows:
    Motorola
    Krzr K3, RAZR 2 V9, RAZR V3XX, V6 Maxx RAZR, W395
    Nokia
    5300, 5320 XpressMus, 5500, 5700 XpressMus, 5800 XpressMus, 6110 Navigator, 6120 Classic, 6124, 6210 Navigator, 6220 Classic, 6233, 6280, 6288, 6290, 6300, 7610 Supernova, E51, E61i, E63, E65, E66, E70, E71, E90, N71, N73, N76, N78, N79, N80, N81, N82, N85, N91, N93, N93i, N95, N96, N97
    Samsung
    Star Player, S7330, U900
    Sony Ericsson
    C510, C702i, C901, C902, C905, F305, G502, G705u, K320i, K530i, K550i, K610i, K660i, K700i, K750i, K770i, K800i, K810i, K850i, S302, S500i, T650i, T700, T707, V630i, V640i, W200i, W550i, W580i, W610i, W660i, W705, W715, W760, W810i, W850i, W880i, W890i, W900i, W902, W910i, W980, Z550i, Z610i, Z710i, Z770i
    Once successfully installed properly, please enable QR Code reader and scan the QR Code by directing the camera towards the QR Code above hp, directly you will see the mobile version BelajarPC.Info blog.


    How to install the QR Code in Blogs
    To my friends who are interested bloggers can install this QR Code for blog. Want to know how? For those bloggers who use Blogspot.com and Wordpress.com blogs must first register in http://forblogs.mofuse.com. And for that use WordPress selft hosting, can also register directly at http://forblogs.mofuse.com or instalkan pluginMobilepress, and open the site http://qrcode.kaywa.com, QR Code to get it.

    Followers


    MandaiPC Copyright © 2011-2012 | Powered by Blogger